Tuesday, November 16, 2010

Creamy Pumpkin Dip With Ginger Snaps

This is one of my all-time favorite Southern Living fall recipes. I just made it night before last since we were hosting our church small group. It's so quick and easy to make and is perfect for entertaining. 
You only need 5 ingredients and it makes plenty to share with friends and family for the holidays!

You will need the following: 


2 (8-ounce) packages cream cheese, softened
1 (16-ounce) package powdered sugar, sifted
1 (16-ounce) can pumpkin
2 teaspoons ground cinnamon
1/2 teaspoon ground nutmeg

Directions: 

Beat cream cheese at medium speed with an electric mixer until creamy; gradually add sugar, beating well. Stir in pumpkin, cinnamon, and nutmeg. Serve immediately, or cover and chill. Serve dip with gingersnaps. 


ENJOY! 

Monday, November 15, 2010

Life After Baby

Well, it has been quite some time since I've done anything of a "craftsy" nature, but we do have a NEW ADDITION to our little family! Our son is 5 weeks old today and his dad and I couldn't be more thrilled or proud. I haven't yet figured out when to work on my little craft projects, etc. so my posts may be a bit sporadic for awhile. Please don't give up on me though! We'll be up and running with a routine soon enough! 

Life after baby is awesome and busy and exhausting, but I wouldn't have it any other way.  :) I can't wait to get to know our little man and watch him grow and explore and learn. It's hilarious the things that are becoming common-place around here. I get peed on, pooped on and spit up on daily and nothing really prepared me for the amount of laundry that comes with a baby! It's quite impressive the number of outfits this little guy can ruin in a single 24 hour period. I think our current record is six or seven. Glad to know he's getting plenty of milk. :) 

Our little furbabies have adjusted fairly well considering the fact that their entire world changed in a day. Lexi has even snuggled up and napped with our little guy. 
How sweet are these two?! :D

Hopefully, we'll be posting regularly in the not-to-distant future. I have lots of projects and recipes I'm looking forward to sharing soon! 

Saturday, October 9, 2010

Keeping Baby's Dressers Organized :)

 I have the baby clothes for our little guy divided into two little white dressers. With my husband, two grandmas, friends and aunts who will be coming and going once he arrives, not to mention my absent-minded pregnancy brain, I thought it would be helpful if I had a bit of a guide available for reference. The elementary school teacher in me likes the idea of keeping organized. :)


One of the dressers is located in the little guy's closet where the colors are bright blue and green. The other matches the room it's in. Wouldn't want you to think I was clashing THAT badly. :D

Friday, October 8, 2010

English Toffee, Anyone?

Well, I'm going to warn you from the very beginning of this blog...this is one dangerous recipe! It is delicious! 

A few weeks ago I got it in my head that I wanted to make English Toffee for the labor and delivery nurses and staff as well as the staff in postpartum. My mother-in-law sent me this recipe and, when she arrived in San Diego a week or so later, we sat to work making several batches. It was far yummier than I'd imagined and we had to make a few extra batches since there was no way I could make something this good and then not have any for friends and family and...well...me  too.  :D 

With that said, here's the recipe. Try at your own risk. :)

Ingredients: 
1 cup sugar
2 sticks butter (must be butter)
5 T. water
1/4 cup finely chopped pecans (Note: I used far more :)
2 cups pecan halves
Hershey bars


Directions:
Grease a large sheet of foil with butter and arrange 2 cups of pecan halves in a circle on the buttered foil. 

Cook the first three ingredients to the Hard Crack stage on a candy thermometer (302 degrees). 

Pour over the pecan halves immediately.

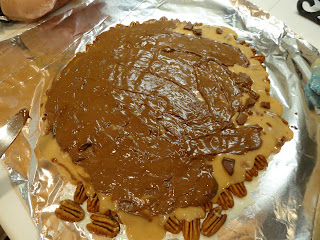
Crumble the Hershey bars over the hot mixture. 

After a few minutes, you can spread the chocolate to cover everything. 

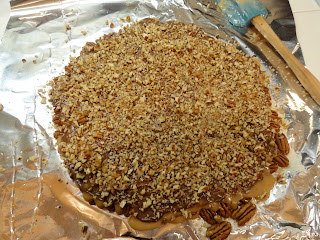
Sprinkle 1/4 cup finely chopped pecans on top. 

Allow to cool and then break into pieces. 

Now, four days past our due date, we have the gifts for the nurses and staff all ready to go. We're just waiting on baby. :)

Check out some awesome link parties here or on my sidebar!

Thursday, October 7, 2010

Lamp Remodel

Well, we're 4 days past our due date and into overtime waiting for this baby. While I've been waiting, I've been working on projects here and there. One of my projects was this lamp. I really hate this lamp...always have. It's one my husband had before we were married. We Craigs Listed it, along with the matching floor lamp, several years ago. To my chagrin, the people who responded only wanted the floor lamp and not the pair. So......

Here's my attempt at making it a little more my style. 

One afternoon while blog hopping, I came across a cute little blog entitled On My Side of the Room. Kendra created an adorable little ribbon lamp which you can check out HERE. When I saw her post, I knew immediately what I wanted to do. I adapted her idea a bit to fit the supplies I already had. 
Below are the "BEFORE" pictures of my "ugly lamp." 


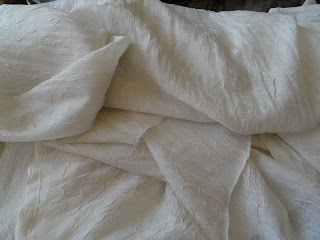
I went to the garage and dug out some fabric that I had used years ago for curtains in my little basement apartment in Richmond, VA. I LOVE it when I can recycle something that I've been holding on to for ages thinking, "I'll need this for something one day." :D Well, "one day" finally arrived for this fabric! 


My mom (who is visiting and waiting for baby's arrival too) and I went to work tearing it into different width strips. I was going for a very shabby chic look. Pictured below are two of the many, many strips we tore.
All I did was tie the strips directly around the lampshade, having the bows fall in different spots. Some strips I just knotted on the back so I wouldn't end up with too many bows and have major overkill. 

Below are the "AFTER" pictures.


I'm pretty happy with how it turned out. I'm not sure if I'm finished or not. I still may want to do something with the base, but it's far more my style now than it was. :D YEA for recycled fabric/Richmond, VA curtains. :D

Here's a shot of the room it's in, just for kicks. 

Now we're back to just waiting for baby. :D

Check out some awesome link-up parties here or on my sidebar. :)

Wednesday, September 29, 2010

Here and There Halloween Decor

Once an elementary school teacher, always an elementary school teacher. I love holidays and I love decorating for them. 

Just little bits of holiday around the house... :D 


Tuesday, September 28, 2010

Ready for Baby*Ready for Fall! :D

Well, we're in the last stretch before our baby boy arrives. Less than one week to go before my due date and I can hardly wait! While I'm waiting for our "little man" I've been nesting like a crazy woman. The other day my mother-in-law and I picked up some pumpkins at Trader Joes and now I feel like my porch says, "Fall."  
Now we're just waiting for our little fall arrival. :)

Monday, September 27, 2010

Diaper Wreath

Check out this ADORABLE diaper wreath one of my girlfriends made for me! I thought it was SO cute and creative! I'd never seen one of these before!

It's going to be so hard for me to ever dismantle it and actually use the diapers! It's just too cute. I'm thinking maybe I'll hang it on the door when our little man arrives?? 

Here's what it looks like on the door. 

Cute, huh? :)

I'm DEFINITELY storing this idea away for future use. It would be just perfect for a baby shower and makes such a fun and unique gift. 

Thanks, Kristen!! :D

Saturday, September 18, 2010

I Highly Recommend....

Rocks In Your Guest Bathroom Sink! :D

I saw this in one of my girlfriend's guest bathrooms and thought it was awesome. Of course, she had this really cool bronze faucet that looks like an old-timey water spout. It was just perfect. However, these are still is dressing up my little sink a bit. I think it gives the room a bit more personality, don't you? I had never seen it before, but apparently others have. My friend and neighbor around the corner has some rocks in her guest bathroom sink as well! 

I'm playing catch-up apparently. :)

Friday, September 17, 2010

A New Etsy Supply Shop Discovery!

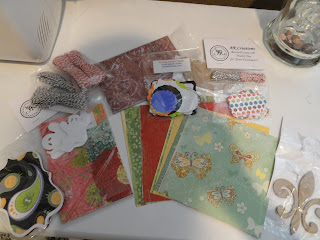
This summer I discovered a great little etsy shop with lots of fun goodies. I recently got a shipment from AR Creations and just look at all the wonderful things I have to "play with" now! :)
(You can always click on the pictures to make them larger.)
So many pretty and fun things! I've already used some of the supplies today to make a gift tag for a friend's baby gift. :)

The seller is a WONDERFUL communicator and responds quickly to any and all correspondence. As a matter of fact, I owe HER an email right now! :D Check out all the fun finds at Annie's shop HERE.

Thursday, September 16, 2010

A Remodel for My Craftin' Corner

The other day my husband and I were working to clean out a little more of our overly-crowded and cluttered garage. As we were going through one box, I found this.

Immediately I knew EXACTLY what I wanted to do with it and what I wanted to use it for. It took a little convincing to get my husband to let me have it. His mother He had decorated in quite a bit of the Americana style before we got married. I like it, but it's not really how I decorate. So....after much conversation and an agreement that the flag would be saved, he let me loose! :)

He was TOTALLY wonderful and even did the spray painting for me since I'm still pregnant and still not supposed to do it myself. What a trooper! :) Thanks, Honey. 


I don't have a picture of it, but I had gone to Lowe's earlier and gotten some thin sheet metal. However, they would not cut it for me there. :( I thought they did everything, but apparently, they don't do this. Sooooo......
I went and purchased my very own pair of these. 
I think they're called tin cutters. I don't really remember. My husband says it's usually the man who always hears his spouse complaining about the "buying of tools." In this family, it's turning the other way around. I told him that I only wished they could have been pink and black. Then I really would have loved them. :)

They worked "ok." They weren't the easiest things to use. However, they did the job and cut the sheet metal to the size I needed. 

Here is the finished product.

I LOVE IT!! It's exactly how I wanted it to turn out. It's the perfect place to hang pendants that I'm working on, store supplies and keep the bottle cap magnets, etc. :D

Another "Southern Living at Home" purchase from the past.....

now being used to shelve some of my craft supplies. 


A $25 shelf from Walmart and one of my favorite signs I already had were just perfect for the space and....

VOILA!

my very own little crafting corner! 

I'm just thrilled to pieces! :D I still have some work to do, but it's a start! What do you think?

Check out THESE link parties!

Wednesday, September 15, 2010

Sour Cream Coffee Cake Success!

I LOVE, LOVE, LOVE "Southern Living at Home" decor. The company has now been renamed "Willow House", but I've been an addict for many years. I love beautiful dishes and I love to entertain, so it was a natural fit. I actually became a consultant for the sole purpose of being able to somewhat afford my addiction. My poor husband did not fully comprehend my affinity for the products until he'd already committed "to death do us part." :D It's okay though... he has his own vices that I had been blissfully unaware of as well. So....we'll call it even. :D Anyway, on with the blog. 

One of my most recent Willow House purchases was this beautiful cake plate and cover. 
Don't you just LOVE the ruffle around the edge?? 

I had borrowed a girlfriend's cake plate for the last two years for my husband's birthday cake, so I decided it was high-time I got my own. The problem....my cabinets are so jam packed with other dishes, that this little beauty has to stay on the countertop for the time-being. Well it can't sit there empty, so I looked for something "pretty" to put in it. 

This is one of my favorite cookbooks - a wedding gift from one of my sweet neighbors when we lived in Oregon. I found a recipe for Sour Cream Coffee Cake and thought it sounded tasty and would look pretty. :) It was both! The recipe is below the following pictures if you would like to try it out! 


Cooling on the stovetop.


Sitting on the ruffly cake stand I just adore :)


Mission Accomplished! No empty cake plates in this house, no maam! 

Hmmm.....this could be a problem. Chronic baking could lead to a chronic growing out of my clothes....
Gonna have to really try hard to either exercise a TON of will power and let my husband gain the majority of the weight....or I'm gonna HAVE to make some room in those cupboards! :)

Sour Cream Coffee Cake
Prep: 30 min; Bake: 1 hour; Cool: 30 min  *16 servings

Brown Sugar Filling (Recipe Below)
3 cups all-purpose or whole wheat flour
1 1/2 t. baking powder
1 1/2 t. baking soda
3/4 t. salt
1 1/2 c. sugar
3/4 c. butter or stick margarine, softened
1 1/2 t. vanilla
3 large eggs
1 1/2 c. sour cream
Vanilla Glaze (Recipe Below)
~~~~~~~~~~~~
Heat oven to 350 degrees. Grease bottom and side of angel food cake pan (tube pan), 10x4 inches, 
12-cup bundt cake pan or 2 loaf pans, 9x5x3 inches, with shortening. 

Make Brown Sugar Filling (see recipe below); set aside. Mix flour, baking powder, baking soda and salt; set aside. 

Beat sugar, butter, vanilla and eggs in large bowl with electric mixer on medium speed 2 minutes, scraping bowl occasionally. Beat about one-fourth of the flour mixture and sour cream  at a time alternately into sugar mixture on low speed until blended. 

For angel food or bundt cake pan, spread 1/3 of the batter (about 2 cups) in pan, then sprinkle with 1/3 of the filling; repeat twice. For loaf pans, spread 1/4 of the batter (about 1 1/2 cups) in each pan, then sprinkle each with 1/4 of the filling; repeat once. 

Bake angel food or bundt cake pan about 1 hour, loaf pans about 45 minutes, or until toothpick inserted near center comes out clean. Cool 10 minutes in pan(s) on wire rack. Remove from pan(s) to wire rack. Cool 20 minutes. Drizzle with Vanilla Glaze (see recipe below). Serve warm or cool. 


Brown Sugar Filling
1/2 c. packed brown sugar
1/2 c. finely chopped nuts (I used pecans)
1 1/2 t. ground cinnamon
~~~~~~
Mix all ingredients.


Vanilla Glaze
1/2 c. powdered sugar
1/4 t. vanilla
2 to 3 t. milk
~~~~~~
Mix all ingredients until smooth and thin enough to drizzle. 


Check out THESE link parties! :)


I'm NOT Dead....REALLY! :D

I've just been a crazy nesting woman trying to get ready for our first baby who is due to arrive in less than three weeks. We were out of town for almost two months, so you can just imagine how crazy behind I am and how much of a panic I've been in to get things as close to perfect as possible. I have managed a few projects and recipes in the in-between moments as of late and will be posting those over the coming days provided our little man doesn't make a surprise early appearance. I've worked on carving out a little crafting space for myself and LOVE how it has turned out. It's not roomy, but it's cute. I've made my first coffee cake ever and it was so YUM! I've got an "organizing for baby" project to show you and I've discovered a fun etsy shop with lots of goodies! That's the teaser....now I need to download all my pictures and get to blogging! Don't give up on me, girls! :D I'm a sporadic new crafter wanna-be who will find my groove soon enough. :)

Tuesday, August 24, 2010

Recycle and Give a Gift!


A few posts back, I showed you a tutorial I had found that solves the dilemma of having all those shopping bags pile up. Today, I'm showing you a tutorial I found on how to make your own gift bags with something you probably throw out on a regular basis. :D

While blog-browsing the other day, I found this idea over at Not So Idle Hands. It's an older post and she had Stephanie from Somewhat Simple as a guest blogger. I thought it was a cute idea and, since I actually had the materials up here in Mammoth Lakes, I gave it a try this morning. 
Here are the supplies that you will need: 

A Cereal or Snack Box
Mod Podge
Sponge Brush
Scissors or X-acto Knife
Hot Glue Gun & Glue Sticks
Wrapping Paper or Scrapbook Paper
Embellishments of Your Choice

Cut the top tabs off of your box.

Measure the length and width of your box and cut your paper to fit. I used scrapbook paper because that's all I had while up in the mountains for 7 weeks. However, after trying this project, I think the wrapping paper might be a little easier to work with. 

Use your sponge brush to cover your box with Mod Podge and adhere the paper to your box. Smooth out any bubbles or creases.

Make a crease on the sides of your box. Hopefully, your crease turns out being a little more centered than my crease did. :D 

With your scissors or x-acto knife, cut handles out on both sides.

Now....this is the part where I need you to use your imagination. :D 
Imagine the bag with yellow tissue paper sticking out and the cute blue raffia tied at the top. :D I don't have embellishments here, so that "cutsifying" will have to happen at a later date. That's what the glue gun is for though. Use rhinestones, ribbon or whatever your heart desires to make it pretty. :D I'm planning to put my little college sister's birthday gift in this. I figure she can use the "bag" for nail polish or manicure/pedicure supplies.

 I think this is such a cute idea and would be something fun to do with kids. It could also come in handy when you're in a bind and need a gift bag ASAP!
~~~~~~~~~~~~~~~~~
On a side-note, I had some leftover scrapbook paper and a brainchild. I have to wait til I get home and can get to my supplies before I can implement my idea though. Darn it! 
 In a future post, see what I make with these! :D 
Any guesses?


I participate in THESE AWESOME LINK PARTIES! Check 'em out!
Related Posts Plugin for WordPress, Blogger...